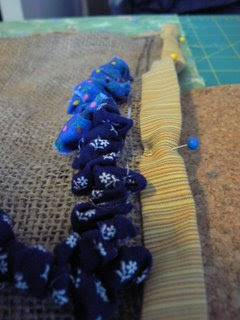
i am racking up some successfully completed craft projects now.
i remember checking out a book in high school about hooked rag rugs and getting really excited about making one - and while that seems like it was just yesterday, um...it wasn't. and now i finally got around to doing it. i love crafts that utilize trash or bits and pieces of things you already have laying around to make something new, so this project was right up my alley. during my last visit to mom's house she let me go through her fabric boxes and pick out things i wanted to take home. i decided to take all her scraps and strips of fabric - both for this project and another one that i have yet to start (but it will surely make a blog appearance once i get around to it).

so the hooked rag rug project goes something like this: you have a piece of burlap (i cut up an old burlap bag we had kicking around the house, but you can also buy burlap and other loose-weave fabrics for this purpose), and you basically take strips of fabric and pull loops through to the front of the burlap to create the rug pile. so it's sort of like you're sewing the fabric into the burlap, but leaving big loops on one side, and not using a needle. here's what the back of the rug looks like when you're done:

supplies:
- piece of burlap the size of your anticipated rug
- sharpie or other marker to draw out design
- crochet hook (there are special rug hooks, but i found a crochet hook worked better for me - i think i used size j)
- fabric scraps, cut into strips about 1.5" wide, the longer the strips the easier to work with, but you can incorporate short strips as well

i think life would have been easier if i had a circular hoop frame to keep my burlap stretched out on, and if i had started from the middle of the piece and worked outward, but i didn't do that and may be on my way to developing early arthritis instead.
for this project, marty drew out the design for the rug, our first initials with arrows. i had a lot of random scraps to work in, with no real apparent color scheme, so i decided to start with the letters and outline them in dark colors and then fill in with a color gradient, greens for the "k" and yellows/reds/purples for the "m".

i recommend doubling over your edges of the burlap and stitching them before you start. i didn't do this and realized that they were starting to fray while i was working on the letter outlines. at that point i stitched an old quilt binding i had leftover from one of mom's quilt projects around the edge of my rug, but this was not really enough to keep it from fraying, you should really fold and stitch. i ended up having to hand sew the parts that were still coming apart on the edges at the end.

the process is remarkably easy and satisfying. this project validated my new obsession with the watch instantly feature on netflix for a week. meaning it's easy to do while watching movies and you can feel like you're still "doing something."

here's the back of the completed rug.
the feel of the rug is great - nice and squishy, and it takes a lot of fabric so it's got a great heft to it. the rug is now positioned in front of the sink, so my feet don't get so tired while i'm doing dishes. plus maybe it will be extra incentive to be doing the dishes with that bright beckonning rug there...


4 comments:
this is seriously amazing. it looks great!
i might need to make one of these for standing on doing dishes, too!
esto es lo que estaba buscando!!!!!!!! excelente trabajo... trataré de ponerlo en practica!!.
pregunta: eso que se ve ahí, es un mate!!!!
Saludos desde imperecto.blogspot.com
Otra vez yo!! rectifico por que no soy "Mac" soy : .:daniela:.
para www.esimperfecto.blogspot.com.
creo que tengo un problema de identidad!!!
Post a Comment