Thursday, December 31, 2009

holiday obsession: cranberries


this year's holiday theme for me has been cranberries. from cooking to crafting to fashion, i'm obsessed with the little buggers and their delightful color.
it started with cranberry relish. well, truth be told it started with a sale on cranberries at the korean market. but then that led to my favorite holiday dish - one that always has people asking for the recipe, so i'll give it to you now. it's the easiest dish to prepare for a big payoff in taste and compliments.

CRANBERRY RELISH
2 cups washed raw cranberries
2 peeled and cored apples (tart kind)
1 large, whole (as in peel and everything) seedless orange, cut into sections
1/3 to 1/2 jalepeno (veined and seeded), chopped fine
1/4 (or more to taste) cup sugar


fill a bowl with cold water and your cranberries - if you're buying a bag you'll have a little left over once you use two cups. wash them around and pick out any soft or wrinkled ones. then you're basically going to add all the fruit chunks above into a food processor - this is way better if you have one of those old school meat grinders and then you can feed everything through that and when you crank it the cranberries make a really satisfying popping sound. if you're using the food processor method you can pulse them until they're chopped into smaller chunks, but you want to be careful not to overblend, otherwise it'll just be mushy - you want the fruits to still maintain their structure. i find it works best for my little cuisinart to do it in batches. when you've chopped up all the fruit you sprinkle the sugar on and mix it around, then let it sit at room temperature for 45 minutes so the sugar melts (this makes a big difference), and then you can keep in in the fridge after that. we started adding jalepeno last year and i love the way it opens up the flavors with a little kick without being noticibly hot.
so there was that.
and then we still had a couple bags of cranberries, so i decided to freeze them. while i was considering what to do with frozen cranberries i made about 5 batches of these viennese crescent (aka russian tea cake, aka mexican wedding) cookies. i use pecans because walnuts make my tongue swell up, but if you can handle walnuts they're a cheaper alternative. this recipe comes from my mom:


CRESCENT COOKIES
½ pound butter
¼ cup granulated sugar
2 cups flour
1 cup ground nuts (walnuts, pecans, etc)
1 teaspoon vanilla
powdered sugar for rolling

Preheat oven to 300 degrees.  Cream the butter, then add the granulated sugar, flour, nuts and vanilla and mix thoroughly.  Shape with your fingers into delicate crescents, about 2 inches long and ½ inch wide and thick.  Roll them in the confectioners’ sugar and bake on an ungreased cookie sheet for about 30 minutes, until just faintly browned.  Cool, then roll in more confectioners’ sugar before serving.


one thing i noticed in my many iterations of this recipe over the course of the week before christmas (we consumed a lot of butter and nuts!) was that i really prefer sweet cream butter in this recipe over unsalted. in fact, i added a sprinkle of salt in with the powdered sugar in that batch to compensate for the lack of saltiness.


these cookies are crazy good. i recommend making them for a party so that you don't just eat them all week and then make more when you run out. ahem.
just to satisfy my cranberry craving, i served the cookies with a little cranberry centerpiece and a few springs of thyme for holiday cheer.
we also discovered that frozen cranberries are a nice compliment to a glass of champagne - and if you muddle them up a bit they turn your toasting glass a nice shade of pink.


and finally, on christmas i had a craving for truffles, and - you guessed it - cranberries. so i followed this basic recipe for bittersweet chocholate ganache truffles, and then added chopped frozen cranberries to the ganache and rolled them around in cocoa powder and nibs with a little salt. they're spectacular. a little on the goey side because i think the cranberries added too much liquid to the mixture, but they hold their shape and the bittersweet chocolate and tartness of the berries goes really nicely together.


to top it off, i've been eyeing this sleaveless turtleneck sweater for a while that i'd gotten from someone and had in the "might be useful for future craft project" bin - and its cranberry color spoke to me recently. i had seen this tutorial on turning old sweaters into a shrug (or "caplet" as they call it), and i'm really into drapey shawls and shrugs these days, so i tried it out with the cranberry sweater.
you basically turn the sweater sideways, pick out the side seams so it opens on the top and bottom, and then cut off the top (and bottom, depending on the sweater) and sew those together. it worked like a charm. i had to pick up the stitches on the top when i cut off from the sleaves and neck portion of the sweater because it's such a chunky knit, but then I stiched it together, and also stitched the bottom of the sweater (where it's ribbed) together and then gathered it for a little flair. i'm really excited about this shrug right now. hannah and i got our nails done the other day and i later realized i'd chosen a sparkle cranberry color, so going out tonight for new years eve is going to continue the theme: cranberry and cocktail dress, here i come!

Tuesday, December 8, 2009

cultivating domesticity is in business


cultivating domesticity has entered into a whole new crafty realm. in the past two weeks we have:
  • conceptualized and designed a new logo and visioning statement for the cultivating domesticity brand
  • had that logo and statement made into two custom rubber stamps for use in business cards and labels
  • started mass production of measuring tape wallets and fused plastic bag pouches
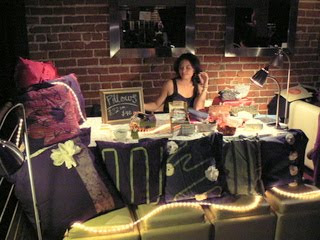
  • set up as a vendor at a craft fair
  • sold some stuff.
  • installed paypal on the blog - check it out on the sidebar
  • and i'm on the way to opening an etsy shop


most of the credit for these efforts goes to my amazing fiance, marty, for supporting and seeing this process through, especially as i'm preoccupied with simultaneously finishing one job and starting another.
also thanks to the help of many friends and family - mom for prepping all the wallets, adrionna and sonny for assisting with shopping, hannah for setting us up at the craft fair and sharing her wisdom, aryn, megan, and katy for their support and visioning with branding language, and all the friends and fam who have been avid readers of the blog and who came out to the first craft fair to support - thank you!


it's been a good learning experience. my sewing machine broke down the night before the craft fair - right when i was counting on pumping out a bunch of last minute wallets.
for one, i learned that "heavy duty thread" is actually for hand quilting, not machine stitching - oops. thanks to the ladies of sew images for teaching me that lesson and fixing the timing issues on my poor machine.  secondly, i only sold two wallets and three pouches during the course of the craft fair, so i didn't have need to be stressing the night before about not having enough products. thirdly, i picked up a lot of good ideas and inspiration for display from other crafters who came to the fair, and our brilliant idea to bring lamps and christmas lights was affirmed when our table was the warmest, most luminous booth in the joint.


lastly, i learned a ton from hannah, who has been doing this kind of thing a while and picked up the slack in terms of things i never thought of, such as: money for change, receipt books, and display. i also learned that if, at the end of the night you haven't really made a profit (as seemed to be the case for most vendors) it's a great idea to go around and trade with other people whose stuff you like. i got a great necklace made out of the little vinyl circle cutouts from the centers of old records from sarah at glitzfritz.

here's the new logo and visioning statement:


i love the rubber stamp aesthetic, and the cost effectiveness and reusability. thanks, marty.


i've already had several orders for measuring tape wallets - if you're interested shoot me an email: cultivatingdomesticity [at] gmail [dot] com
i'm relishing the process of packaging and sending them out. i love gifts. if you're looking for holiday gifts you can order now and have them in time for the holidays... i'm just saying.


Sunday, November 29, 2009

venturing into the world of business crafting


i'm trying out something new here at cultivating domesticity:
mass production.
we've been busy little bees cooking up a plan to make my crafting endeavors profitable, and working long hours in what marty lovingly refers to as "the sweatshop."


my thing has always kinda been about trying out new ideas, patterns, recipes - i'm excited by experimentation. but i've been realizing i'm lacking the second half of that process, refining and perfecting.
i noticed this around thanksgiving meal planning this year. thanksgiving is one of those times when people love to indulge in the tried and true classics, and it's an opportunity to showcase your best recipes. as much as i love to cook, i don't have any best recipes. i found myself scouring the internet for tasty-looking ideas for new things to make for thanksgiving, and it made me realize that i haven't settled in on any recipes long enough to develop any standard go-to dishes.


so for the new year my intentions are to balance new experimentation with refining and perfecting some good ones.


same with crafting. i'm constantly making one-offs based on new ideas and methods i want to try out. as much fun as that is, it's not a way to make money. and i've been ruminating on how to make my crafting time profitable. a couple of ideas have come up: one is starting an etsy shop. the other is selling at craft fairs. it just so happens that there's a craft fair coming up here in oakland, and it's going to be held at our friends' brand new nightclub, the new parrish. it's the perfect spot for our foray into the business craft world. cultivating domesticity will be there.


and thinking about marketing my crafts has started all kinds of ideas around branding "cultivating domesticity:" developing a logo for business cards, tags, and website - notice we now own the domain www.cultivatingdomesticity.com (thanks early santa!). marty's helping me think through design and the intentions behind the brand, so stay tuned for more on that as it develops.


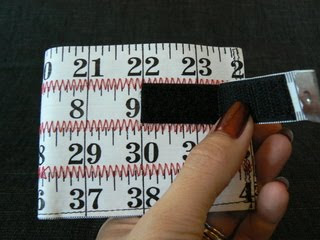
the one thing i make that i've been working on perfecting for a couple years now is the measuring tape wallet. i made myself a wallet out of measuring tapes a while ago, and the checkout counter interest in that wallet is through the roof. i have been kicking myself on a regular basis that i don't just make extras and carry them in my purse because i could probably sell at least one a week just responding to people's interest.


but i've been working on perfecting the design. my original design involved a snap grommeted right into the measuring tape itself, and the constant pressure of snapping/unsnapping everyday eventually wears out the measuring tape material. i've tried several prototypes over the past few months employing different methods of strengthening the snap area, but with marty's help we finally just solved the problem: velcro. now with confidence in the long-term durability of these wallets we're putting them into full effect.


so back to the sweatshop. 
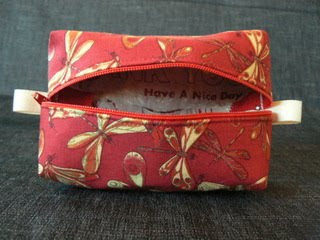
this is the perfect craft fair to showcase cultivating domesticity, but the timing is a little tight. we just got back last week from hawai'i, and i'm in the process of ending one job and starting another, so it's been long hours in the studio with lots of help from friends and family. mom came down this weekend for thanksgiving, with the understanding that she'd need to put in some hours in the sweatshop if she wanted any turkey. thanks to her speedy and steady work we've got all the measuring tapes cut and prepped for wallets, plus a bunch of dragonfly fabric cut for pufferfish pouches.


marty has become the resident expert on fusing plastic bags. we'll devote a separate blog post to the process of recycling plastic bags into water-resistant pouches, it deserves it's own spotlight. suffice it to say right now that marty has developed several new innovations on the technique that ratchet the quality and aesthetic of the product up several notches.


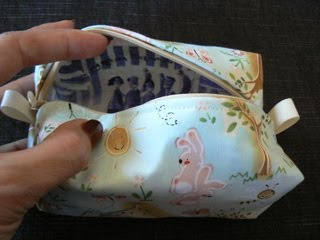
i've been experimenting with several different shapes and sizes of pouch, some small enough for sunglasses and sewing accessories, others big enough for cosmetics and toiletries. i love the structure and puffiness that the fused plastic provides these bags; adding a fused plastic layer to the pufferfish pouch, along with twill tape tabs to help with the zippers has made a great bag way better.


so here's your sneak peek at what we'll be offering at this year's feria urbana craft fair this thursday, december 3rd from 6-10pm at the new parrish.
if you're in the area: come through to support and enjoy music, drinks, food, crafts, and good company.
if you're not in the area but are thinking about holiday gifts, hit me up at cultivatingdomesticity@gmail.com - i'm taking orders!


Wednesday, October 14, 2009

hoarding heirloom tomatoes for winter


suddenly in the past two weeks it's turned into winter in the bay area. i really wasn't prepared for this since i was just walking around barefoot at the park a couple weeks ago, but as the chill sets in and now the rain has started i'm kicking into squirrel mode - hoarding and saving all the fruits of summer/fall for the long hard winter ahead (ahem, forgive me friends who live in places that actually have winter - i think i'm funny).


much as i was doing at about this time last year, i decided to start by canning our precious heirloom tomatoes while we're still getting them in our farm box and they're still gracing the farmers markets. last year i was a little grumbly at the price of preserving heirlooms, since they shrink down so much that the cost to cans produced ratio shocked me. but come the middle of the winter when the only tomatoes in sight are those hot house water sponges in the grocery store i was so grateful to be able to crack open a jar full of the flavors of fall. so i vowed to make them again this year, and here i am.


i supplemented our usual farm box tomato stash with a run to the farmers market, only to realize when i went to pay for my bounty that i didn't have enough cash. thankfully the guy at the stand knows me (he's one of my two favorite vendors at the farmers market) and graciously told me i could pay him next time. i mention this because it's happened to me a couple of times in the past month - once at a coffee shop i'd never been to before in the financial district of san francisco - and i love the recognition that even in a seemingly big, anonymous urban place people look out for and trust each other.


i had to call to consult with aryn, since i was tomato canning solo this time, about temperatures and process. it goes something like this: wash your tomatoes. oil a baking pan (or two in this case) generously with olive oil. aryn made the "generous with olive oil" point to say that the tomatoes seem to do nothing in the oven for a while, and then reach a point where they burn easily if you don't have enough oil on the pan. i experienced this; she's right.


i also tossed in a few whole cloves of garlic with the tomatoes this time, figuring everything is made better with roasted garlic. stick your pans in the oven at about 400 degrees for somewhere between 20-40 mins. i hear you can slow roast tomatoes, but i'm not really one for slow processes.
if you're canning heirlooms, you're likely to have a variety of sizes of tomatoes - from very small to very large, thus the range of cooking time. watch them carefully and once they slump into a little puddle it's time to take them out - i opened the oven every few minutes to take them out in ascending order of size so the little ones wouldn't burn.


while your tomatoes are in the oven you can get started on the water bath. bring a giant pot of water to boil, and steralize your jars and lids by boiling them for about 5 mins.


when all your tomatoes have successfully roasted you can layer them in the jars with basil, garlic, and lemon juice. the lemon juice here is crucial - about 2 tablespoons per jar - to discourage botulism. i like to layer them in alternating colors, with a basil in between, and then top it off with a little of the tomato juice/olive oil mixture left in the pan from roasting. it also helps to run a spatula around the edge of the jar to encourage the air bubbles to come out, and i recommend doing this before you top off the jar at a 1/4 inch from the rim - otherwise it can get messy. i speak from experience. make sure you wipe the edges of the jar so you can get a clean seal and screw on your lids to they're on but not too tight.


process the jars in the boiling water bath for 40 mins (or longer if you're using larger jars).  take them out and let them cool for a day somewhere where they won't be disturbed. make sure your seal was created properly (the lid shouldn't be able to pop up and down when you press on it). and admire your work. good luck waiting until winter to crack them open; i've been salivating over mine all week.


Sunday, October 11, 2009

the pufferfish pouch - happy birthday to ali


last weekend was my little sister, aliana's 9th birthday. she went zip-lining with my dad. i'm so jealous and bummed i couldn't be there to celebrate with them in person. but i did celebrate her birthday by making a few crafty goodies to send her way (and calling to wake her up on the big day at 6am - not knowing she had the week off of school - oops).


i found this pattern for what marty has aptly named "the pufferfish pouch." it's a super cute boxy zippered pouch for keeping your goodies, and fast to whip up once you have the hang of it.


i included in the pouch one of my coveted measuring tape wallets. i started making these about a year ago and checkout ladies all over the bay have been wanting to purchase them. i'm perfecting the design before i start mass producing them, but i think if i ever get around to starting an etsy page this will be my first item of sale. my problem with making business out of my crafts is that i never want to make a lot of one thing - i just want to try out new ideas all the time. but that's no way to make money. so stay tuned for a possible craft business starting in the near future.
finally, i made ali a button bracelet - hey, why don't we wear buttons as jewelry more often? there are some great buttons out there. it's been a while since i've made any kind of jewelry, so i hope my techniques will hold up to the test of time and gradeschool pressure.


i sure miss being around for family time - i'm looking forward to a visit soon.

Monday, October 5, 2009

roasted red pepper dressing


we've been getting tons of bell peppers in our farm box lately, and i love peppers - but i rarely buy more than one red or yellow bell pepper because they're so pricey.  did you know that red bell peppers are the same as green bell peppers, they're just ripe?  


anyway, i didn't really know how to handle this influx of colorful peppers in my life - and while we've been chopping them up and adding to dishes i still had a handful left over. so i pulled out a recipe from the complete vegetarian cookbook for sweet pepper dressing.  it's delicious and good on all sorts of things.


i love roasting red peppers, so i went ahead and did that rather than boiling like the recipe calls for.  my preferred method for roasting is to throw the peppers on a sheet pan under the broiler - i even do it in the toaster oven if the peppers are small enough to fit in there without touching the broiler - that way you can monitor their progress easily through the window.  just rotate the peppers every few minutes as the skin starts to blacken so that they're nice and charred all over.  then i pop them in a paper bag - which helps the skins loosen from the flesh - and let them cool in there.  peel the skins off and take out the stems and seeds.  this one ended up looking like somebody's heart, i thought.  and then you throw the pepper in the food processor with some oil and vinegar and salt and pepper - i also added a bit of lemon juice to mine - and that's it.

here's the recipe:


SWEET PEPPER DRESSING
Makes about 1 cup

1 large red pepper
4-6 tbs olive oil
2 tsp wine vinegar
a little lemon juice (optional)
salt and freshly ground pepper

1.    [if you don't want to roast your peppers like i did you can use this method:] Put the whole pepper into a saucepan and half cover with water.  Bring to a boil, then simmer for 15-20 mins, until the pepper is very tender.  Test by piercing it with a fork.
2.    Drain the pepper and remove the stalk and seeds.  Purée the pepper in a blender or food processor, then add the oil and blend again.  You should have a thickish scarlet emulsion, like a mayonnaise.  Gently stir in the vinegar and salt and pepper to taste.


we used the roasted red pepper dressing as a pizza sauce since i'm not really a fan of tomato sauce.  it was delicious - kind of sweet and very flavorful.  i imagine it will also be good on salads, pasta, and i think it would pair well with cheese and crackers.


Tuesday, September 29, 2009

bacon and bubbles at the beach... plus a surprise


last weekend was my birthday. and sele's - we're birthday twins. we decided to celebrate our lives with two of our favorite things - bacon and champagne. it was a great party.  good friends with blankets in the sun, eating bacon and drinking champagne - what more could you ask for?


i had to scale back my ambitions for making bacon treats for the party - so i wouldn't spend the whole day fussing in the kitchen and get out to enjoy myself.  i had a few ideas of bacon dishes i wanted to try, and a lot more that didn't get made.
included in the things that didn't get made are:
bacon truffles
peanut butter bacon cookies
bacon rice crispies
bacon jam
bacon (as in, making it yourself...another time)


i found this recipe for bacon pops: basically goat cheese balls rolled in crumbled bacon, pecans and herbs - and i love all those things, so that was definitely on the menu. it didn't exactly turn out the way i expected - the bacon and pecan mixture didn't so much crumble as it did melt into a kind of sticky, chunky butter, and i didn't feel like sticking lollipop sticks in them, so they were a little mushy - but really, with those ingredients it was bound to taste good.  serving with slices of apple was a good move - as there's only so much bacon and cheese one can eat before needing a pallet cleanser.


i had intended to make bacon-wrapped cherries, which seemed like a wonderful combination of sweet and savory, but i guess cherries are out of season now - so i returned to the classic bacon-wrapped dates stuffed with more of the goat cheese-herb filling.  very tasty, though i have to say aryn brought bacon-wrapped dates stuffed with gorgonzola, and i think gorgonzola is much tastier in that dish.


sele made bacon waffles that she filled with dulce de leche ice cream in a kind of choco taco-like effect.  awesome. 


sele also contributed the best bacon-themed gift:


yes, that's bacon lip balm.  it's an experience that really can't be described.  you'll just have to try it.  don't worry, it's vegan and kosher.


marty and i were enamored with these mimosas we had recently at our friends hannah and win's wedding that included a splash of port, so we recreated those for the party.  these were a huge hit - though i can't tell you how many times we had the conversation:
"it's a mimosa - with port,"
"what?! there's PORK in here?"
i guess that's what you can expect when you're having a bacon and champagne party.

and then, toward the end of the party came one of the biggest suprises of my life...
it went something like this:


i said "yeah."