
Showing posts with label good for the earth. Show all posts
Showing posts with label good for the earth. Show all posts
Monday, August 29, 2011
composting with bokashi
here's a little video i made about my newest composting system: the bokashi bucket.
bokashi is an anaerobic (lacking oxygen) composting method that essentially pickles your food waste with the help of some special microbes. you can even compost meat and dairy - which I'm stoked about.
i never know how to dispose of old meat scraps, and so i've been saving used ziplocks and sealing them up in there and throwing them out - but that feels so gross. i just know somebody down the line (either picking up my garbage bin or at the dump) is doing to have to deal with the nastiness that is some rotting meat in a plastic bag. eew. so i'm stoked beyond words to have a legitimate way of returning that stuff back into the ecosystem.
the process is pretty simple, you sprinkle the microbe mixture on top of any food scraps you put in the bucket, and then when the bucket is full you dump it into a hole and bury it in the ground for 2-4 weeks, and then it's decomposed! magic. you can even make your own bokashi powder, which i'd like to try when i run out.
i've been hearing about bokashi and wanting to try it, but i was hung up on making my own bucket system (which of course never happened), and then i saw a deal come up on Kanu Values - full disclosure, this is where i work- but i've really been chomping at the bit to get a bokashi kit, and the deal sold out in about 30 minutes. the kit comes from each one teach one farms, here on o'ahu, and then have some pretty great resources on their website.
let me know what you think of the video - i'm pretty proud of my nascent video editing skills - next time i'll use my phone to film in HD, and probably repaint my fingernails.
btw, i'm over apologizing for not posting in forever, i fell of the "project a week" wagon. hard. and now i'm doing my best to get back on the horse.


Tuesday, April 26, 2011
week nine: planting in dresser drawers

when we first moved into our little studio we weren't entirely sure how long we'd be staying in the place. we have a nice little backyard space, and i was itching to grow things, but i didn't want to plant a bunch of stuff only to move out before we could harvest. so we came up with a compromise: planting in recycled dresser drawers. they provide us a sort of grab-and-go garden, able to pick up and take them with us if needed.


Monday, February 14, 2011
week six: valentines fortune cookies


so i went for the paper ones. check out this great tutorial on how to do it. it took me a bit to get the right size for the magazine pages to be transformed into cookie shapes rather than just crumpling or folding in half.


Wednesday, February 9, 2011
week five: compost death star!

so we have been having a backlog of compost build up in our freezer (we keep a ziplock baggie in the freezer until we can put food scraps in the worm bin), and it became apparent we needed to start another composting system. if i had a little more space and wasn't renting a place where we live quite close to our neighbors, i think i would start a regular old compost pile in the yard. but i'm not sure how long we're going to be renting this spot and i'd hate to leave the landlord a pile of decomposing matter in the backyard if we move out. so i wanted to keep our compost bin contained.
i did a lot of internet research and read some excellent books from the library on different methods of composting, and i got excited about the compost tumbler as a system that was well suited (and fun!) for us. it's a self contained barrel that spins on an axis, thus providing ample aeration that is crucial to expediting the composting process. it keeps pests out, and looks a little more managed than a pile. plus you don't have to dig into it and turn it, which i think is one of those things i would avoid doing.
i wanted to build a compost tumbler myself, and there are great tutorials out there for how to do it, but i realized that it would take me a long while to scrounge up recycled materials to build with and borrow the tools necessary, and our freezer is filling up all the while, so i made the decision to buy one premade. i chose a compost tumbler i wanted, the cheapest model i could find, and went to purchase it online - because there doesn't seem to be anyone (besides costco - and they don't have the model i wanted) who sells compost tumblers here on o'ahu. however, as i found out through numerous online sellers and amazon, shipping to hawai'i would cost me more than the tumbler itself! so i had to scrap that idea.

Death Star Composter from Willie Maze on Vimeo.
marty and i breathlessly assembled it (a really fun process of snapping pieces together) and brought out our squirreled away bits of food scraps we've been hoarding to fill it up. it turns out to quite resemble the death star. here's the video of that process, watch for the impromptu cameo appearance of our friend, brutus.
Monday, January 17, 2011
week two: egg carton sprouts


so i got the idea of using the egg carton as a tray for sprouting peas. i figure it's biodegradable paper, and it should hold up for the week or two it'll take for the sprouts to grow. i used some potting soil i had leftover from various other planting projects and was pleased to note that the little closure flap on the egg carton fit like a puzzle piece into the little open area on the top of the carton, so i could use both sides for planting.

Sunday, August 8, 2010
worm composting!

i am so excited about worms right now. i’ve been hearing about worm composting for a while, and now that we’re living in a space with a garden (and no curbside composting) we decided to go for it.
so the first question is: where do you get worms?
i did some research on this, and it turns out that while earthworms are great for your garden, they are not the ones you want in your compost bin. as it was explained to me, earthworms are kind of solitary, slow-eating fellows, who generally like to stay buried in the dirt. the worms you want for composting are the kind that like to live in a colony, come to the surface to eat (the term is “epigeic”), and eat their body weight in food every day. there are two types of ideal composting worms: red wrigglers and blueworms. now, i read somewhere that you could pick up bait worms from a fishing shop and those would work – but i don’t do enough fishing to know if that’s true, and i suppose it depends on your bait shop. it’s worth a shot if you can distinguish red/blue worms from earthworms.
 |
| this is the blueworm, Perionyx excavatus |
so we went to the worm store and they were super helpful answering all our worm questions. the worms eat any kind of food scraps, paper, cardboard, leaves – they don’t recommend putting in meat or dairy because it spoils and smells bad and can attract other kinds of critters to your worm bin. i’ve also heard not to put garlic or onions in there, but the guy at the worm store said that’s just for the sake of smell, the worms will eat it. what I found out recently from my friend noelle recently is they don’t like rice, so i’ve been avoiding putting rice in the bin.
we left the worm store with a ziplock baggie full of worms and dirt – and because we had a few more errands to run and I didn’t want to leave them in the hot car – i carried around a purse full of worms for the afternoon.

we made the worm bin ourselves, it’s really easy so i don’t recommend buying a worm bin unless you’ve got money to burn. i got a tupperware bin from walmart for $5 - i think i bought a bigger size than I needed for starting out (18 gallons), but i figure the worms can grow into it. i would actually recommend starting out with a smaller bin (like 10 gallons), since the worm guy said if they're in a large bin they spend more time looking for food and for each other to mate, so they eat/reproduce more slowly. we drilled ¼” holes on the bottom, sides, and lid for ventilation, and then put it up on cement blocks with a tray underneath to catch the worm juice. yep, worm juice. they call it “worm tea” and it supposedly makes a really good fertilizer for your plants – you can dilute it 20:1 and spritz the leaves, or water the soil with it.


then it was time to put the worms in their new home. we poured out the worms and dirt from the ziplock, and they say you should mix in some of the dirt they’re used to into your new bedding, this involves slowly carving away at the outsides of the dirt pile. these worms really don’t like light, so they’ll dive inward away from the outside of the pile as you carve the dirt away, leaving a wriggling ball of worms in the middle – which is pretty fun.


once you’ve got the dirt mixed in with the bedding you can put your worm ball in there – don’t break them up, they’ll do that on their own. and then feed them and put more newspaper on top and tuck them in with another layer of burlap. you can leave your worm bin uncovered – which helps with ventilation, but it also invites other critters in there and since our backyard is a lizard haven I didn’t want to encourage the lizards to predate our worms – those little buggers are expensive! so we keep a lid on ours.


if you figure they eat their body weight in food a day, you can start out feeding them ¼ lb of food scraps daily – or what we’ve been doing is keeping a bag of scraps in the freezer and then feeding them the whole bag at the end of the week. i’ve also heard that the freezing process helps break down the food so they can eat it faster. keep in mind you have to thaw it before putting it in the bin – you don’t want frozen worms. as they start to break down the newspaper you can add more, and always bury your food scraps underneath the newspaper layer, and keep everything moist – they like moist, dark conditions. you can even keep your worm bin inside your house – but since we have very limited indoor space we’re keeping them in the shade outside. you can expect other kinds of bugs and stuff to live in there with the worms and help break down the food. as long as you keep nice conditions for the worms they should leave peacefully together. They worm guy said that if your colony is unhealthy that’s when other organisms can come in and take over.

and that’s it! they’re super low maintenance and so gratifying. marty and i never thought we’d be so excited about worms. they look really happy themselves; they’ve been getting fatter and reproducing. and though they were kind of shy for the first week and hanging out at the bottom of the bin, now they’re eager to come up and eat stuff.

our first few feedings were really coffee grounds- heavy, because that was pretty much all we were producing in waste when we first moved in. i’m not sure how the worms deal with coffee, but i figured we might be cracking them out on caffeine, so i stopped putting coffee grounds in, and started sprinkling them around the outsides of our planter boxes so discourage slugs from munching our vegetables. i also try to chop tougher things – like rinds and peels – up before feeding it to them, just to encourage the breakdown process.
the worm poops are called “vermicast,” also known as “gardeners gold” because it’s great for planting and adding extra nutrients to your garden. once your worms have eaten their way through about 6 months worth of food, you can harvest the vermicast – and separate out some worms to give away if you like. i’ll give a full report when we’re ready to harvest.
Tuesday, December 8, 2009
cultivating domesticity is in business

cultivating domesticity has entered into a whole new crafty realm. in the past two weeks we have:
- conceptualized and designed a new logo and visioning statement for the cultivating domesticity brand
- had that logo and statement made into two custom rubber stamps for use in business cards and labels
- started mass production of measuring tape wallets and fused plastic bag pouches
- set up as a vendor at a craft fair
- sold some stuff.
- installed paypal on the blog - check it out on the sidebar
- and i'm on the way to opening an etsy shop

most of the credit for these efforts goes to my amazing fiance, marty, for supporting and seeing this process through, especially as i'm preoccupied with simultaneously finishing one job and starting another.
also thanks to the help of many friends and family - mom for prepping all the wallets, adrionna and sonny for assisting with shopping, hannah for setting us up at the craft fair and sharing her wisdom, aryn, megan, and katy for their support and visioning with branding language, and all the friends and fam who have been avid readers of the blog and who came out to the first craft fair to support - thank you!

it's been a good learning experience. my sewing machine broke down the night before the craft fair - right when i was counting on pumping out a bunch of last minute wallets.
for one, i learned that "heavy duty thread" is actually for hand quilting, not machine stitching - oops. thanks to the ladies of sew images for teaching me that lesson and fixing the timing issues on my poor machine. secondly, i only sold two wallets and three pouches during the course of the craft fair, so i didn't have need to be stressing the night before about not having enough products. thirdly, i picked up a lot of good ideas and inspiration for display from other crafters who came to the fair, and our brilliant idea to bring lamps and christmas lights was affirmed when our table was the warmest, most luminous booth in the joint.

lastly, i learned a ton from hannah, who has been doing this kind of thing a while and picked up the slack in terms of things i never thought of, such as: money for change, receipt books, and display. i also learned that if, at the end of the night you haven't really made a profit (as seemed to be the case for most vendors) it's a great idea to go around and trade with other people whose stuff you like. i got a great necklace made out of the little vinyl circle cutouts from the centers of old records from sarah at glitzfritz.
here's the new logo and visioning statement:


i love the rubber stamp aesthetic, and the cost effectiveness and reusability. thanks, marty.

i'm relishing the process of packaging and sending them out. i love gifts. if you're looking for holiday gifts you can order now and have them in time for the holidays... i'm just saying.


Sunday, November 29, 2009
venturing into the world of business crafting

i'm trying out something new here at cultivating domesticity:
mass production.
we've been busy little bees cooking up a plan to make my crafting endeavors profitable, and working long hours in what marty lovingly refers to as "the sweatshop."

my thing has always kinda been about trying out new ideas, patterns, recipes - i'm excited by experimentation. but i've been realizing i'm lacking the second half of that process, refining and perfecting.
i noticed this around thanksgiving meal planning this year. thanksgiving is one of those times when people love to indulge in the tried and true classics, and it's an opportunity to showcase your best recipes. as much as i love to cook, i don't have any best recipes. i found myself scouring the internet for tasty-looking ideas for new things to make for thanksgiving, and it made me realize that i haven't settled in on any recipes long enough to develop any standard go-to dishes.

so for the new year my intentions are to balance new experimentation with refining and perfecting some good ones.

same with crafting. i'm constantly making one-offs based on new ideas and methods i want to try out. as much fun as that is, it's not a way to make money. and i've been ruminating on how to make my crafting time profitable. a couple of ideas have come up: one is starting an etsy shop. the other is selling at craft fairs. it just so happens that there's a craft fair coming up here in oakland, and it's going to be held at our friends' brand new nightclub, the new parrish. it's the perfect spot for our foray into the business craft world. cultivating domesticity will be there.


and thinking about marketing my crafts has started all kinds of ideas around branding "cultivating domesticity:" developing a logo for business cards, tags, and website - notice we now own the domain www.cultivatingdomesticity.com (thanks early santa!). marty's helping me think through design and the intentions behind the brand, so stay tuned for more on that as it develops.
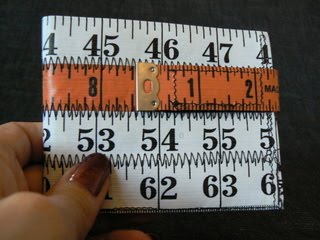
the one thing i make that i've been working on perfecting for a couple years now is the measuring tape wallet. i made myself a wallet out of measuring tapes a while ago, and the checkout counter interest in that wallet is through the roof. i have been kicking myself on a regular basis that i don't just make extras and carry them in my purse because i could probably sell at least one a week just responding to people's interest.

but i've been working on perfecting the design. my original design involved a snap grommeted right into the measuring tape itself, and the constant pressure of snapping/unsnapping everyday eventually wears out the measuring tape material. i've tried several prototypes over the past few months employing different methods of strengthening the snap area, but with marty's help we finally just solved the problem: velcro. now with confidence in the long-term durability of these wallets we're putting them into full effect.

so back to the sweatshop.
this is the perfect craft fair to showcase cultivating domesticity, but the timing is a little tight. we just got back last week from hawai'i, and i'm in the process of ending one job and starting another, so it's been long hours in the studio with lots of help from friends and family. mom came down this weekend for thanksgiving, with the understanding that she'd need to put in some hours in the sweatshop if she wanted any turkey. thanks to her speedy and steady work we've got all the measuring tapes cut and prepped for wallets, plus a bunch of dragonfly fabric cut for pufferfish pouches.

marty has become the resident expert on fusing plastic bags. we'll devote a separate blog post to the process of recycling plastic bags into water-resistant pouches, it deserves it's own spotlight. suffice it to say right now that marty has developed several new innovations on the technique that ratchet the quality and aesthetic of the product up several notches.

i've been experimenting with several different shapes and sizes of pouch, some small enough for sunglasses and sewing accessories, others big enough for cosmetics and toiletries. i love the structure and puffiness that the fused plastic provides these bags; adding a fused plastic layer to the pufferfish pouch, along with twill tape tabs to help with the zippers has made a great bag way better.

so here's your sneak peek at what we'll be offering at this year's feria urbana craft fair this thursday, december 3rd from 6-10pm at the new parrish.
if you're in the area: come through to support and enjoy music, drinks, food, crafts, and good company.
if you're not in the area but are thinking about holiday gifts, hit me up at cultivatingdomesticity@gmail.

Subscribe to:
Posts (Atom)


